We’re well into the Biggest Ideas in the Universe series, and some people have been asking how I make the actual videos. I explained the basic process in the Q&A video for Force, Energy, and Action – embedded below – but it turns out that not everyone watches every single video from start to finish (weird, I know), and besides the details have changed a little bit. And for some reason a lot of people want to do pedagogy via computer these days.

So let me explain my process here, starting with the extremely short version. You need:
- A computer
- A video camera (webcam okay)
- A microphone (computer mic okay)
- A tablet with writing instrument (e.g. iPad Pro and Apple Pencil)
- Writing app on the tablet (e.g. Notability)
- Screen capturing/video editing software on the computer (e.g. Screenflow)
- Whatever wires and dongles are required to hook all that stuff together.
Hmm, looking over that list it doesn’t seem as simple as I thought. And this is the quick-and-easy version! But you can adapt the level of commitment to your own needs.
The most important step here is to capture your writing, in real time, on the video. (You obviously don’t have to include an image of yourself at all, but it makes things a bit more human, and besides who can possibly talk without making gestures, right?) So you need some kind of tablet to write on. I like the iPad Pro quite a bit, but note that not all iPad models are compatible with a Pencil (or other stylus). And writing with your fingers just doesn’t cut it here.
You also need an app that does that. I am quite fond of both Notability and Notes Plus. (I’m sure that non-iOS ecosystems have their own apps, but there’s no sense in which I’m familiar with the overall landscape; I can only tell you about what I use.) These two apps are pretty similar, with small differences at the edges. When I’m taking notes or marking up PDFs, I’m actually more likely to use Notes Plus, as its cutting/pasting is a bit simpler. And that’s what I used for the very early Biggest Ideas videos. But I got numerous requests to write on a dark background rather than a light one, which is completely reasonable. Notability has that feature and as far as I know Notes Plus does not. And it’s certainly more than good enough for the job.
Then you need to capture your writing, and your voice, and optionally yourself, onto video and edit it together. (Again, no guarantees that my methods are simplest or best, only that they are mine.) Happily there are programs that do everything you want at once: they will capture video from a camera, separately capture audio input, and also separately capture part or all of your computer screen, and/or directly from an external device. Then they will let you edit it all together how you like. Pretty sweet, to be honest.
I started out using Camtasia, which worked pretty well overall. But not perfectly, as I eventually discovered. It wasn’t completely free of crashes, which can be pretty devastating when you’re 45 minutes into an hour-long video. And capture from the iPad was pretty clunky; I had to show the iPad screen on my laptop screen, then capture that region into Camtasia. (The app is smart enough to capture either the whole screen, or any region on it.) By the way, did you know you can show your iPhone/iPad screen on your computer, at least with a Mac? Just plug the device into the computer, open up QuickTime, click “new movie recording,” and ask it to display from the mobile device. Convenient for other purposes.
But happily on Screenflow, which I’ve subsequently switched to, that workaround isn’t necessary; it will capture directly from your tablet (as long as it’s connected to your computer). And in my (very limited) experience it seems a bit more robust and user-friendly.
Okay, so you fire up your computer, open Screenflow, plug in your tablet, point your webcam at yourself, and you’re ready to go. Screenflow will give you a window in which you can make sure it’s recording all the separate things you need (tablet screen, your video, your audio). Hit “Record,” and do your thing. When you’re done, hit “Stop recording.”
What you now have is a Screenflow document that has different tracks corresponding to everything you’ve just recorded. I’m not going to do a full tutorial about editing things together — there’s a big internet out there, full of useful advice. But I will note that you will have to do some editing, it’s not completely effortless. Fortunately it is pretty intuitive once you get the hand of the basic commands. Here is what your editing window in Screenflow will look like.
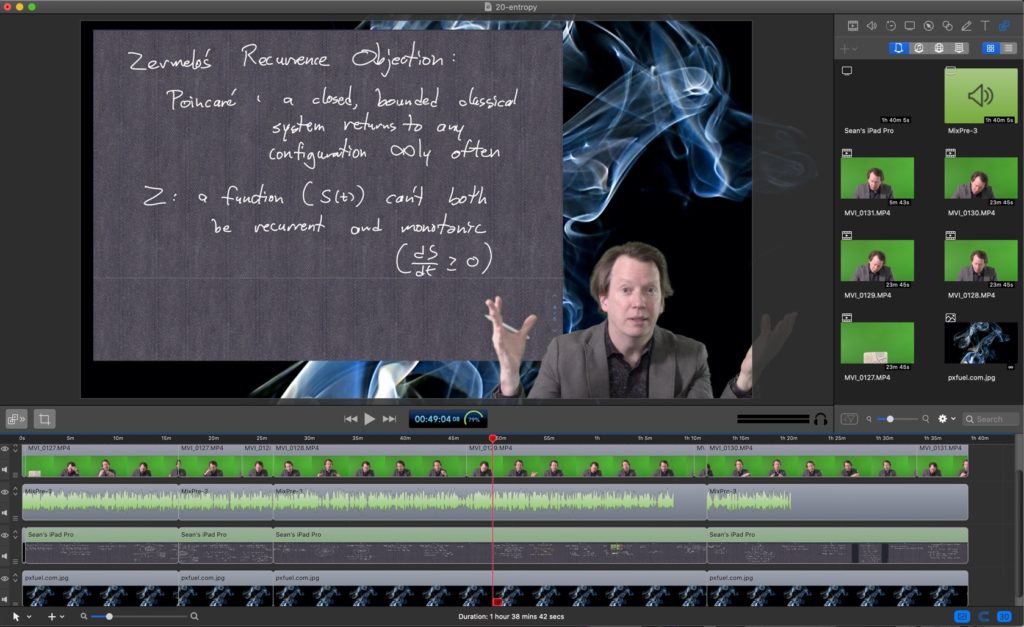
Main panel at the top left, and all of your tracks at the bottom — in this case (top to bottom) camera video, audio, iPad capture, and static background image. The panel on the right toggles between various purposes; in this case it’s showing all the different files that go into making those tracks. (The video is chopped up into multiple files for reasons having to do with my video camera.) Note that I use a green screen, and one of the nice things about Screenflow is that it will render the green transparent for you with a click of a button. (Camtasia does too, but I’ve found that it doesn’t do as well.)
Editing features are quite good. You can move and split tracks, resize windows, crop windows, add text, set the overall dimensions, etc. One weird thing is that some of the editing features require that you hit Control or Shift or whatever, and when exactly you’re supposed to do this is not always obvious. But it’s all explained online somewhere.
So that’s the basic setup, or at least enough that you can figure things out from there. You also have to upload to YouTube or to your class website or whatever you so choose, but that’s up to you.
Okay now onto some optional details, depending on how much you want to dive into this.
First, webcams are not the best quality, especially the ones built-in to your laptop. I thought about using my iPhone as a camera — the lenses etc. on recent ones are quite good — but surprisingly the technology for doing this is either hard to find or nonexistent. (Of course you can make videos using your phone, but using your phone as a camera to make and edit videos elsewhere seems to be much harder, at least for me.) You can upgrade to an external webcam; Logitech has some good models. But after some experimenting I found it was better just to get a real video camera. Canon has some decent options, but if you already have a camera lying around it should be fine; we’re not trying to be Stanley Kubrick here. (If you’re getting the impression that all this costs money … yeah. Sorry.)
If you go that route, you have to somehow get the video from the camera to your computer. You can get a gizmo like the Cam Link that will pipe directly from a video camera to your computer, so that basically you’re using the camera as a web cam. I tried and found that it was … pretty bad? Really hurt the video quality, though it’s completely possible I just wasn’t setting things up properly. So instead I just record within the camera to an SD card, then transfer to the computer after the fact. For that you’ll need an SD to USB adapter, or maybe you can find a camera that can do it over wifi (mine doesn’t, sigh). It’s a straightforward drag-and-drop to get the video into Screenflow, but my camera chops them up into 20-minute segments. That’s fine, Screenflow sews them together seemlessly.
You might also think about getting a camera that can be controlled wirelessly, either via dedicated remote or by your phone, so that you don’t have to stand up and walk over to it every time you want to start and stop recording. (Your video will look slightly better if you place the camera away from you and zoom in a bit, rather than placing it nearby.) Sadly this is something I also neglected to do.
If you get a camera, it will record sound as well as video, but chances are that sound won’t be all that great (unless maybe you use a wireless lavalier mic? Haven’t tried that myself). Also your laptop mic isn’t very good, trust me. I have an ongoing podcast, so I am already over-equipped on that score. But if you’re relatively serious about audio quality, it would be worth investing in something like a Blue Yeti.
If you want to hear the difference between good and non-so-good microphones, listen to the Entropy video, then the associated Q&A. In the latter, by mistake I forgot to turn on the real mic, and had to use another audio track. (To be honest I forget whether it was from the video camera or my laptop.) I did my best to process the latter to make it sound reasonable, but the difference is obvious.
Of course if you do separately record video and audio, you’ll have to sync them together. Screenflow makes this pretty easy. When you import your video file, it will come with attached audio, but there’s an option to — wait for it — “detach audio.” You can then sync your other audio track (the track will display a waveform indicating volume, and just slide until they match up), and delete the original.
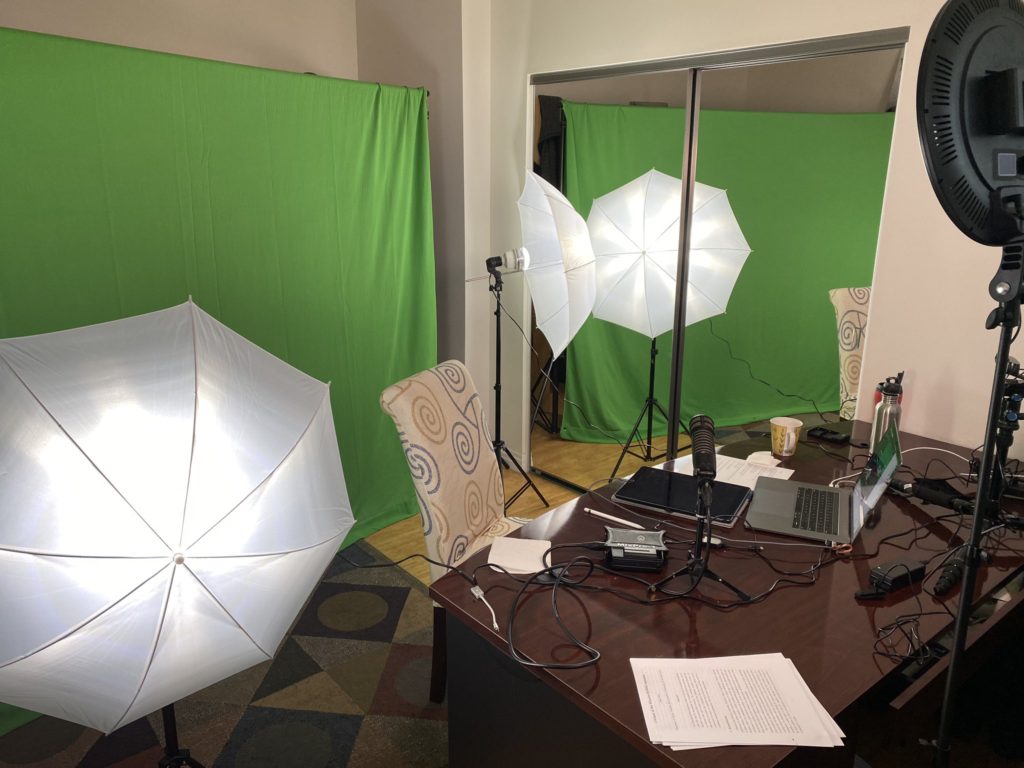
Finally, there’s making yourself look pretty. There is absolutely nothing wrong with just showing whatever office/home background you shoot in front of — people get it. But you can try to be a bit creative with a green screen, and it works much better than the glitchy Zoom backgrounds etc.
Bad news is, you’ll have to actually purchase a green screen, as well as something to hold it up. It’s a pretty basic thing, a piece of cloth or plastic. And, like it or not, if you go this route you’re also going to have to get lights to point at the green screen. If it’s not brightly lit, it’s much harder to remove it in the editor. The good news is, once you do all that, removing the green is a snap in Screenflow (which is much better at this than Camtasia, I found).
You’ll also want to light yourself, with at least one dedicated light. (Pros will insist on at least three — fill, key, and backlight — but we all have our limits.) Maybe this is not so important, but if you want a demonstration, my fondness for goofing up has once again provided for you — on the Entanglement Q&A video, I forgot to turn on the light. Difference in quality is there for you to judge.
My home office looks like this now. At least for the moment.
Oh right one final thing. If you’re making hour-long (or so) videos, the file sizes get quite big. The Screenflow project for one of my videos will be between 20 and 30 GB, and I export to an mp4 that is another 5 GB or so. It adds up if you make a lot of videos! So you might think about investing in an external hard drive. The other options are to save on a growing collection of SD cards, or just delete files once you’ve uploaded to YouTube or wherever. Neither of which was very palatable for me.
You can see my improvement at all these aspects over the series of videos. I upgraded my video camera, switched from light background to dark background on the writing screen, traded in Camtasia for Screenflow, and got better at lighting. I also moved the image of me from the left-hand side to the right-hand side of the screen, which I understand makes the captions easier to read.
I’ve had a lot of fun and learned a lot. And probably put more work into setting things up than most people will want to. But what’s most important is content! If you have something to say, it’s not that hard to share it.
Dear Sean, besides your inspiring videos and –you like it or not– classes on the Big Ideas, the making of is of great help for someone like me, trying to follow your steps. Will try and see how it goes. Thanks a lot!!
Fantastic. Your videos look great! Thank you for explaining how you put them together. Well done!
How detailed are your lecture notes? Do you rehearse any of the flow beforehand? Or have you explained the concepts so often that all you need are short reminders and a few numbers, equations, dates, etc.?
I am always amused at the end of every video when you neatly sum up in a couple of sentences the importance or relevance of the topic, and then end — always — with the same expression on your face.
Thanks, Sean!
Thanks Sean. I’m rocking windows and android but found your breakdown very interesting.
Sean, Thanks for sharing your experience with making educational video’s. It will be quite helpful to me.
Your Biggest ideas series has been outstanding and your volume of output is amazing. I have not been able to keep up with your rate of production. Thankfully I can access them later, as I am able.
This old dog is finally learning some new tricks.
Great stuff once again, Sean. We in Africa are just amazed as we desperately try to keep up! Your detailed advice is crtainly very useful, though the options beyond the basics are rather limited as you will appreciate. Most intriguing is the fact that you are not only a world class educator in theoretical physics, but also apparently a hands on, practical human being. I have learned more from your post about the topic of virtual education delivery than all the so-called specialist sites and apps. Greatest of all however, is the fact that I personally am much more knowledgeable about cosmology and theoretical physics even though I am a fine arts educator (graduated University of Arizona, 1988; University, 1993). Though its not easy, I try to keep up with the videos whenever time allows. Thank you so much. Phebion Kangai
Sean, Thanks for the information. Very useful.
Occasionally, the video feed jerks forward a bit, without any interruption in the audio. Are these small edits — to cover a cough or sneeze or meow — or just artifacts?.
This is great. I have a similar set up for teaching IRL, and I also invested in an trackpad – you can effortlessly use the cursor (which is a nice translucent circle, rather than a pointer) to gesture at stuff whilst you’re talking, and change into other apps if needed. Since I teach machine learning, I also have a wireless keyboard for typing code, but I mostly draw.
Thanks for the insights!
Which Blue Yeti model do you use? What I’m particularly interested in, is it a USB or an XLR model?
(Listening to your Mindscape podcasts, I’ve noticed for a good while now that your guests’ voice tracks are often much less pleasing to the ear than your own. And with yet another online-only term approaching, I’m increasingly unhappy that my students should endure my lectures in anything other than top-notch quality.)
I don’t use a Blue Yeti myself, I use an ElectroVoice RE-320. It’s an XLR mic that I pipe through a SoundDevices MixPre-3.
Thank you! 🙏
One doesn’t have to purchase a relatively expensive green screen, at least while experimenting with a system setup. I have found that thin plastic tabletop covers of approximately the right shade taped up on the wall behind you do just fine for things like Zoom’s virtual background. And this is for plastic sheets that can be gotten at a party or dollar store!
If you really want to go low budget, record the show-face portion of the program on Zoom in a solo meeting with your free Zoom account (turn on the original-sound setting for best voice pickup)! When reduced to screen-corner thumbnail size, the lower video quality isn’t that distracting.